How I Create Online Classes — Creating the Videos
How I Create Online Classes — Creating the Videos
by Jeffrey D. Shaffer
Hello once again and thank you for coming back to read the next part of my three-article explanation of why and how I handle my online classes. In the first article I explained the logic behind my online classes and why I chose the services I chose — Email and YouTube. This time, as promised, I will explain in some detail about how I create my online class videos. I will talk about the software I use, the methods and techniques I use for online teaching, tips and tricks for editing videos to make them more appealing and easier to understand (at least in my mind), and the settings I use when uploading them to YouTube. So, let’s jump right in!
THE SOFTWARE & PREPARATION
First is the software. Last year when all of the teachers at my university suddenly found ourselves teaching online courses, I took a few moments to stop and think — what would be the best online experience for my students? And perhaps more importantly, what would be the best online experience for the current generation of tech-savy youngsters! The answer that came to me was “YouTuber”, and more specifically, the image I saw in my mind was something like an online-gamer. For those unaccustomed to the online gaming community and the fans that watch them, both YouTube and Twitch.tv are popular online sites where viewers (like ourselves) go to watch gamers (professional and amateur alike) play games, typically live. The most interesting feature of this time of “streaming” is that the game fills our screen and the gamer, himself or herself, is also visible in one of the corners of the screen. So, the common “experience” for the viewer is the game is the main with the gamer still visible on screen. For me, that meant that my computer screen would be the main, and I, in place of the gamer, should be visible in the corner of the screen. This is particularly appealing as I teach English as a foreign language and it’s very important for the students to be able to see my facial expressions and watch my mouth.
So, I went out and looked at a few affordable software solutions and chose what seemed the most useful and most reasonable at the time. The software I chose last year has since changed names and undergone somewhat of a pleasant upgrade (apparently the world-wide surge to work and teach online has been good to the parent company). The current program is called DemoCreator by the company “WonderShare” (https://democreator.wondershare.com). Currently it costs about $60US for a permanent license. DemoCreator records both your computer screen AND the front-facing camera, so when you go to edit your video, you can arrange them any way you like, and even add simple effects and transitions (I will explain a bit more about this later).
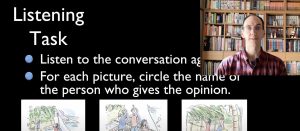
Initially I just used my laptop for recording my classes. For many of my classes, I already have PowerPoint presentations created to use in the classroom. For these classes, I needed to edit my presentations to make room for my own little video in the corner, otherwise I might accidentally cover up some of the text from the presentation like in the image below:
Once the presentations were edited, I started recording using DemoCreator and then simply taught to the screen as if I were teaching class. For the classes where I do not use a presentation, I would open up a blank Word file and write down key points as I spoke, giving the students visual clues to help them follow along with the lesson. This is like using a chalkboard in class, but with the advantage of being able to highlight words or phrases for emphasis or even edit mistakes “live” while I explain what the problem is and how to fix it.
PRAGMATICS
I very much want all of my pre-recorded, online classes to feel interactive. As much as possible I want the student to feel like they are in a real class and that they are expected to interact with me, the teacher. So, when I read sentences a loud, I DO ask them to repeat after me. I will sometimes ask them to shadow a passage as I read. And for conversation practice, I will take the place of their partner and when possible, we will “act out” a dialogue together. Obviously there are times where this is somewhat impossible, however, if you choose some topics beforehand, it is quite manageable. The only things I have NOT been able to compensate for is group-work. But even then, if I can, I will reframe such activities as pair-work, decide the basic topics before hand, and still try to play-act with my students.
In order to help my students know when it is my turn to talk or their turn to talk, I simply gesture to myself then gesture to them (i.e., the camera). And just like in a real class, I tell jokes, ask questions, and encourage them to speak louder, and even encourage them that they are doing well. That might sound silly, as obviously I cannot hear them, and I’m certain some students feel it’s goofy, BUT, if I really want the majority of my students to feel like they are in a real classroom, then I need to treat them like they are — thus I encourage, joke, laugh, and have practice dialogues.
Now, there are many obvious advantages to holding an online class this way. One obvious and great advantage is that students can repeat any part of the video they want over and over. Did they have trouble hearing the dialogue? Just back up and listen again. Am I speaking too fast? Just slow down the playback. Can they read better than they can listen? Turn on the closed captioning.
So far, I get a lot of positive feedback from my students. Of course we all prefer to be in a live classroom, but when we cannot, at least they are enjoying the jokes, and most of them say they are very glad they can see my face each lesson.
EDITING
Back to the editing… I record my entire class using either PowerPoint or a blank Word document, then I say good-bye and encourage them to keep in touch and do their best, then I click “stop” and DemoCreator opens up the video editor (see image below).
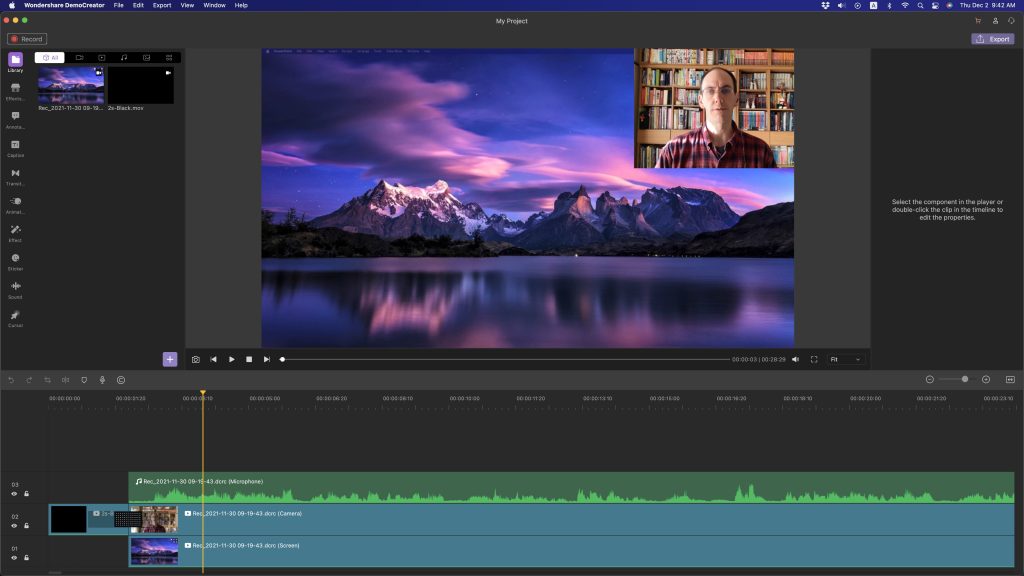
If you have never used a video editor before, it might look overwhelming, but honestly it’s not bad once you’re tinkered with it a few minutes. At the upper-left hand of the screen are your audio and video files (which should be automatically added after you record). You can also select different effects and tools here. At the bottom of the screen is your timeline. Here is where your audio and video files will go. If you drag-and-drop the file you just created you will see THREE lines appear across the bottom. The bottom-most line is your screen video (with audio imbedded), the middle line is your front-facing camera feed (sans audio), and the top-most line is the audio from your computer’s microphone. The upper-right side of the screen is where you can change the qualities of each of these three lines. For example, I always click on the top audio line and then in the upper-right editor, I change the audio volume from 100% to 120% as my microphones always seem to be a little quiet. The top-middle window is where you will see the finished video. It will reflect all of the changes you have made in your audio and video files.
As I have said before, I want my videos to feel very much like a gamer streaming their videos, and I also want it to feel highly polished — I want the students to feel like they are valuable, so I do not simply start or stop a video. Just like professional videos, I have a “fade in from black” at the start and a “fade out to black” at the end. I achieved this trick by adding a two second black video to the start and end of my recorded video in the timeline, then drag-and-drop the “face” transition from the upper-left selection of tools. I also fade-in and fade-out the audio. This can be achieved by selecting the audio timeline and right-clicking. You will then get a little toolbar, and in that toolbar select “Edit Audio”. You can them slide the little circle that appears.
There are many many other features, but I try to stick with just the basics. I do not want to overproduce my class videos, (a) because it’s too time consuming, and (b) too much editing and too many special effects start to look silly. So, I stick with just the fade-in and fade-outs and adjust the audio volume.
EXPORTING
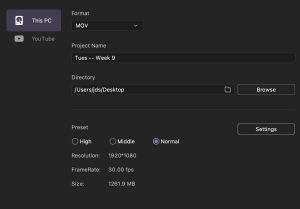
Exporting can seem a bit confusing, but I try to keep this simple, too. When you are done editing your class video (be sure to safe often!), simply click the little “Export” button at the very top-right and you’ll be presented with several export options. I typically stick with a MOV file, then I click the “Settings” button on the middle-right a change the settings to a resolution of 1920*1080, and then a preset of Normal. This seems to give me a nice, large, but crisp video that’s not too large (file-size on the computer). Note that it might take a long time to “render” your completed video to disk! The speed depends on the power of your computer, but times of 45-90 minutes is not unusual! So be patient, and be sure to record your videos at least a day or two before your class! (I do mine the week before.)
UPLOADING TO YOUTUBE
I then upload this video to YouTube. I click on the little camera icon in the top-right of the screen and select “Upload Video”. I then select the video I just created and a new window pops up with way too many options! Don’t worry, though, I’ll try to walk you through at least the basic options I set.
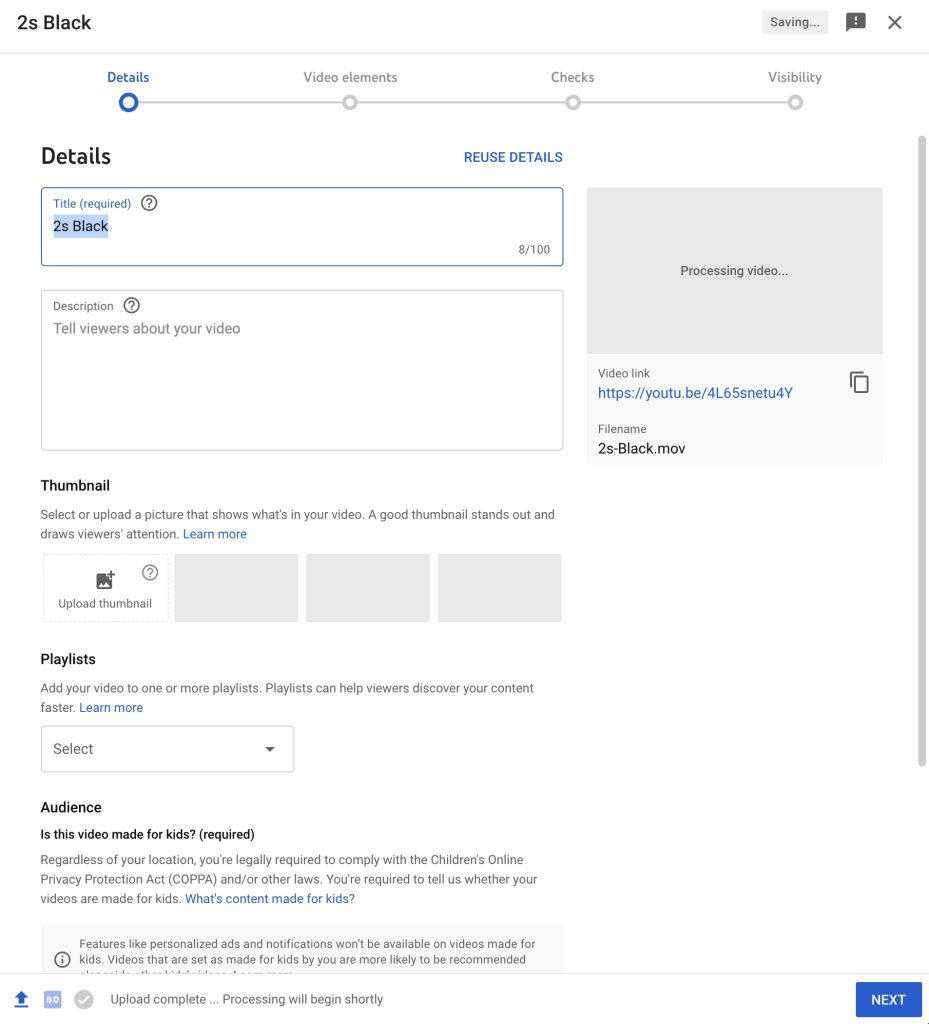
In the image above, you see the basic YouTube video settings screen. In the least you will need to:
- Set a title for your video
- Add a description (I typically just say what chapter or what today’s topic is)
- COPY the “video link” on the right and save it for later. You will need to email this to your students!
- I then select the best looking Thumbnail (or you can create a custom one if you are good with editing pictures).
Then scroll down a bit more and select the “No, it’s not made for kids” and click the “SHOW MORE” button. Under the “SHOW MORE” settings, make the following changes:
- Turn off “Allow automatic chapters”
- Set the video language to the language you are speaking (I select “English (US)”). This allows the YouTube system to automatically add closed captioning for your videos — essential!
- Turn off “Allow embedding”
- Turn off “Publish to subscriptions feed and notify subscribers”
- Turn off “Allow people to sample this content
- Change “Comment Visibility” to “Disable comments”
- Turn off “Show how many viewers like and dislike this video
- Then click “NEXT” in the bottom right… Click NEXT again, and click NEXT again, then finally select “Unlisted” for your video and click “SAVE”.
All that is left is for you to wait for it up upload and be processed. Once it’s done, you can share the video link URL you copied with your students.
THE LOGIC BEHIND MY YOUTUBE SETTINGS
Just as with my desire to keep my videos simple, I want to keep the video-viewing experience simple as well. I don’t want my students to be distracted by comments and likes or dislikes. I want them to simply experience the video. I also add the “language” so they will have the option to turn on the closed captioning. If I do NOT set the language for my video, the students will not be able to turn on the closed captioning system, which means they will NOT be able to read what I am saying (which would be a huge loss to their reading and listening practice). And lastly, be sure to select “unlisted”. I always chose this option so I do not run afoul of any copyright laws. Many of my classes are based on textbooks, and I do not want to make the publishers upset. So, my videos can only be found if I share the video link URL. And when the semester is over, I am careful to delete all my videos. Of course, if you are creating your own custom and copyright-free contents, you don’t have to worry about this, but I personally prefer to keep things private, just as the classroom is “private.”
CONCLUSION
And there you go, a kind of whirlwind tour of how I create, edit, and upload my class videos. I don’t intend for this to be a rich, step-by-step tutorial. I just wanted to introduce the basics to you. There are plenty of real tutorials out there on the DemoCreator website and on YouTube, as well. But I hope the main thing you take away from this article and this short series of articles, is that the students are the center, and their “learning experience” is key. Everything I do is about giving my students the most “natural” feeling class experience through a medium they are already accustomed to (YouTubers and game streamers). And so far, this seems to be a success, as far as “on demand” classes allow.